Explore essential tips on legal requirements, choosing materials, installation techniques, and maintenance for a durable and stylish fence for your property.Are you considering installing a fence around your property but unsure where to start? You’re not alone; many homeowners are drawn to the idea of tackling this DIY project to enhance their outdoor space while adding privacy and security. In this blog post, we’ll guide you through the essential steps to confidently install your own fence. From understanding the legal requirements that govern fence installation in your area to choosing the right materials that suit your preferences and budget, we’ll cover it all. You’ll learn how to prepare your ground effectively, explore various installation techniques and tips, and even discover the best practices for maintaining and repairing your fence over time. With the right information at your fingertips, you can transform your vision into reality. So let’s dive in and get started on your fencing journey!
Understanding the Legal Requirements
Before diving into your DIY fencing project, it’s crucial to understand the legal requirements associated with installing a fence on your property. Various local regulations and zoning laws dictate how high the fence can be, what materials are permitted, and where the fence can be placed in relation to property lines.
In many areas, homeowners must obtain a building permit before commencing any fencing work. This process may involve submitting detailed plans that outline the proposed location, height, and type of materials for your fence installation. It’s also pivotal to consult your local city or county website, as they often provide specific guidelines and forms needed for this purpose.
Additionally, engaging with your neighbors is an essential step. Understanding property boundaries and maintaining a good relationship with those living adjacent to you can prevent conflicts down the road. It’s a good practice to notify them of your intention to install a fence and to check if there are any easements or restrictions that may affect your project.
Choosing the Right Materials
When it comes to installing your own fence, selecting the right materials is crucial for the durability and aesthetics of your project. Different fencing materials offer varied advantages and are suited for different types of environments and purposes.
| Material | Durability | Cost | Maintenance |
|---|---|---|---|
| Wood | Moderate | Low to Moderate | High (requires regular treatment) |
| Vinyl | High | Moderate to High | Low |
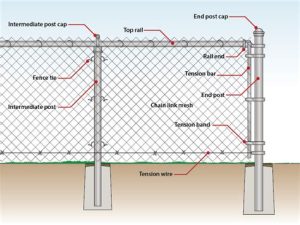
| Chain Link | Low to Moderate | Low | Low |
| Aluminum | High | Moderate to High | Very Low |
| Steel | Very High | Moderate to High | Low |
When making your choice, consider the climate of your area. For instance, wood may warp or rot in very humid areas but can be a beautiful option in drier climates. Vinyl, on the other hand, resists fading and is less prone to damage from the elements. Think also about the level of privacy you desire; solid panels of wood or vinyl can provide privacy, whereas chain link may not.
Another factor to consider is the initial and long-term costs associated with the materials. While wood may seem like the most economical choice upfront, the ongoing maintenance and potential replacements may add up over time. Weigh all these factors carefully to choose the material that will best fit your needs and budget.
Lastly, don’t forget to check with your local regulations or homeowners’ associations regarding fencing materials, as there may be restrictions or guidelines that could influence your decision. Understanding these aspects will bolster your confidence as you get started with your fencing project.
Preparing the Ground for Installation
Preparing the ground for your fence installation is a crucial step that can significantly impact the durability and aesthetics of your fence. A well-prepared site ensures that the fence is stable, level, and positioned correctly.
- Clear the Area: Remove any debris, rocks, or existing plants from the fence line. Make sure the area is free of obstacles to facilitate an easy installation.
- Check Local Regulations: Before beginning, it is advisable to check local codes or homeowners’ association regulations to confirm any specific requirements regarding fence placement.
- Mark Your Fence Line: Use string or stakes to mark where your fence will go. This will provide a clear visual layout and help you understand the amount of material you’ll need.
- Measure and Level: Use a measuring tape to determine the correct distance between fence posts. It’s also essential to ensure that the ground is level where your posts will be placed.
Once you have completed these steps, you can confidently move forward with the installation, knowing that you’ve set the groundwork for a sturdy and well-aligned fence. Just remember, taking the time to properly prepare the site will save you a lot of effort during installation and likely lead to a more satisfying result.
Having a well-prepared ground not only enhances the structural integrity of the fence but also contributes to its lifespan. The right preparation ensures that the fence stands strong against the elements and daily wear and tear.
In summary, don’t underestimate the importance of preparing the ground for your fence installation. Following these guidelines will help you achieve a successful fencing project, boosting your confidence as you embark on this endeavor.
Installation Techniques and Tips
Installing your own fence can be a rewarding DIY project, but it’s crucial to approach it with the right installation techniques and tips to ensure a durable and aesthetically pleasing result. Below are some key strategies to help you successfully install your fence.
1. Level and Mark the Location: Before you start digging, make sure to mark the location where your fence will go. Use stakes and string to outline the perimeter. This step is vital for keeping your fence straight and ensuring that it adheres to property lines.
2. Digging Holes: The depth and spacing of your post holes depend on your fence type. A general rule is to dig holes that are one-third the height of the fence posts. Use a post hole digger or auger to make the job easier. Ensure each hole is deep enough to provide stability.
3. Setting the Posts: After digging, place the fence posts in their holes and add concrete for extra support. Ensure each post is level and straight before the concrete sets. You can use a level tool to check this on all sides.
4. Attaching the Panels: Once the concrete is cured, it’s time to attach the fence panels. Depending on your chosen fence style, you may need to pre-drill holes or use brackets for a secure fit. Reference the manufacturer’s guidelines for the best practices regarding your specific fence type.
5. Finishing Touches: After installation, make sure to paint or stain your fence if necessary. This not only enhances its appearance but also provides protection against the elements. Additionally, inspect for any sharp edges or splinters that could pose a safety risk.
Maintaining and Repairing Your Fence
Maintaining your fence is vital to ensure its longevity and functionality. Regular upkeep not only keeps your fence looking great but also helps prevent costly repairs down the line.
- Regular Inspections: Periodically check your fence for signs of wear and tear. Look for loose boards, rusted nails, or any fragile sections that may need immediate attention.
- Cleaning: Depending on the material of your fence, cleaning it may vary. Wooden fences can benefit from a power wash to remove dirt and mold, while vinyl fences can simply be wiped down with soap and water.
- Paint and Stain: If you have a wooden fence, maintaining its finish with paint or stain can significantly improve its durability, protecting it from the elements.
If you discover any damage during your inspections, it’s crucial to address these issues sooner rather than later. For example, repairing small holes or replacing cracked boards will help maintain the integrity of your fence. Regular maintenance can prevent larger issues that could lead to a complete fence replacement.
In addition, if you notice any sections that look unstable or have shifted, it may be a good idea to consult with a professional. They can provide guidance on whether you can handle these repairs yourself or if you need assistance for more severe damages.
Ultimately, being proactive about your fence’s maintenance and repair needs will ensure it remains a sturdy and attractive boundary for years to come.
Frequently Asked Questions
What are the basic steps to install my own fence?
Before installing your own fence, you should start by planning the layout, obtaining necessary permits, marking the boundaries, digging post holes, setting the posts in concrete, and finally attaching the fence panels.
What tools do I need to install a fence?
Essential tools for fence installation include a post hole digger, a level, a tape measure, a hammer, a saw for cutting panels, a shovel, and safety gear such as gloves and goggles.
Do I need a permit to install a fence?
It often depends on your local regulations and the height or type of fence you plan to install. It’s crucial to check with your local zoning office to determine if you need a permit.
How do I determine where to put my fence?
You should mark your property lines, check local boundary surveys if available, and consider any easements or restrictions before deciding on the fence placement.
What types of fences can I install myself?
Common types of fences suitable for DIY installation include wooden privacy fences, picket fences, chain-link fences, and vinyl fences, each with varying levels of complexity.
How can I ensure my fence is level and straight?
Use a level while setting each post and a string line stretched between posts as a guide to maintain a straight line throughout the installation.
What should I do if I encounter underground utilities while digging?
If you encounter any underground utilities while digging, stop immediately and contact your local utility company to safely identify and work around those lines.


