Discover essential steps for a successful DIY fence project, from planning and gathering materials to installation and final touches. Enhance your outdoor space today!When embarking on a do-it-yourself fence installation project, understanding the timeline can be crucial for a successful outcome. Whether you’re aiming to enhance privacy, boost curb appeal, or create a safer environment for your family, planning is key. This blog post will guide you through the essential steps of the process, from the initial planning phase to the final touches that will make your fence truly stand out. We will break down each stage, including gathering the necessary materials and tools, prepping the area, installing the fence panels or boards, and the all-important finishing touches and cleanup. By following this timeline, you can effectively manage your time and effort, ensuring your DIY fence project is completed efficiently and with great results. So roll up your sleeves, and let’s dive into the timeline for your DIY fence installation!
Planning your DIY fence project
When it comes to a DIY fence project, effective planning is crucial for ensuring the process goes smoothly. Start by determining the purpose of your fence—whether it is for privacy, security, or simply to enhance your yard’s aesthetics.
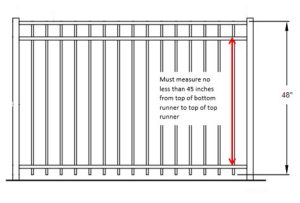
Next, consider local zoning laws and regulations, as these can vary widely depending on your area. Reach out to your local government or check their website for compliance requirements, such as height restrictions or property line guidelines.
Another important step involves choosing the right fence material that not only matches your budget but also suits the climate conditions in your area. Popular options include wood, vinyl, and chain link. Create an overall budget and ensure you allocate funds not only for materials but also for tools and any necessary permits.
Lastly, visualize your design. Sketching a layout can help you determine how many panels you will need and how they will be spaced.
Gathering materials and tools
When embarking on your DIY fence project, gathering materials and tools is a crucial step that can set the foundation for a successful installation. Having everything you need before you start will help you avoid delays and ensure a smoother process.
- Fence panels or boards: Choose based on your preferred style and material (wood, vinyl, etc.).
- Posts: These will be the backbone of your fence, so select a sturdy type.
- Concrete mix: For securing your posts in the ground.
- Screws or nails: Depending on the type of fence, ensure you choose rust-resistant options.
- Stain or paint (optional): If you want to enhance the look of your fence, make sure to select weather-resistant finishes.
In addition to materials, you’ll also need the right tools to perform the installation efficiently.
- Post hole digger or auger: For digging holes for your fence posts.
- Level: To ensure your fence is straight.
- Tape measure: For accurate measurements.
- Hammer or drill: Depending on how you’ll be securing the panels to the posts.
- Safety gear: Including gloves, goggles, and protective clothing.
Now that you have a clear understanding of the materials and tools required for your DIY fence project, you’re one step closer to creating a fence that meets your needs and adds value to your property!
Prepping the fence area
Before embarking on your DIY fence project, prepping the fence area is a critical step that sets the stage for a smooth installation process. Proper preparation can save you time, effort, and potential headaches down the line. This guide will help you identify the essential tasks to complete during this phase.
First, you need to mark the fence line accurately. Use stakes and string to outline where the fence will go. Ensure you account for any curves or obstacles in the area. It’s advisable to consult your local zoning laws regarding property lines and setback regulations. Having a clear visual of your fence perimeter will streamline the next steps.
Next, check for underground utilities that may run through your proposed fence line. It’s crucial to call your local utility companies to mark any underground pipelines or cables to avoid damaging them during installation. Using a utility locator can help as well. Finally, clear the area of any debris, rocks, or vegetation that may hinder your fence installation. This ensures a clear workspace for setting up your fence posts and panels.
Installing the fence panels or boards
Once you’ve completed the preparations and gathered all your materials, the next crucial step is installing the fence panels or boards. This part of the process can determine the overall look and durability of your fence, making it vital to conduct this step properly.
Before you start, ensure you have your fencing materials—including panels, screws, and tools—ready to go.
- Begin at one corner of your yard and work your way to the other end, placing each panel or board in alignment.
- Use a level to ensure that each panel is straight and even.
- Secure each panel with screws or nails, depending on the material type you have chosen.
- Make adjustments as necessary to maintain a uniform look across all panels.
- Consider adding a stabilizing post or brackets if the panels appear unstable.
Once all panels are up, take a moment to step back and admire your work! At this point, you can also check for any uneven gaps or misalignment that might need correcting. This attention to detail can ensure that your fence not only looks great but also stands the test of time.
Applying finishing touches and cleanup
After you’ve spent time on your DIY fence installation, it’s essential to take the final steps to ensure your hard work pays off in the long run. This phase involves applying the finishing touches and conducting a thorough cleanup of the area. Let’s break down the key aspects of this crucial last stage.
Start by inspecting the entire fence for any loose boards or hardware. Make sure every panel is securely fastened, and adjust as necessary. If you notice any spaces between the fence and the ground that could allow pests to enter, you might want to fill those gaps with soil or gravel to provide a smooth finish. Additionally, consider applying paint or sealant to protect your fence from the elements, enhancing both its durability and aesthetics.
Once everything is secured and finished, it’s time to tackle the cleanup. Remove any debris, tools, or excess materials from your project area. Not only does this help your yard look tidy, but it also prevents hazards that could cause accidents. Dispose of materials responsibly, recycling wherever possible. Finally, take a moment to admire your newly completed fence – a project well done!
Frequently Asked Questions
What factors influence the timeline for fence installation?
Factors such as the type of fence, the size of the area, weather conditions, and the skill level of the installer can significantly impact the installation timeline.
How long does it typically take to install a wooden fence by yourself?
On average, installing a wooden fence can take anywhere from 1 to 3 days, depending on the length of the fence and the number of posts needed.
What are the steps involved in a DIY fence installation?
The steps generally include planning the layout, obtaining necessary permits, marking boundaries, digging post holes, setting the posts, attaching panels, and finishing with gates and post caps.
Is it advisable to install a fence during winter?
While it is possible to install a fence in winter, the cold weather can make digging post holes and handling materials more challenging. It might extend the timeline due to weather-related delays.
What tools are necessary for fence installation?
Essential tools include a post hole digger, level, measuring tape, hammer, saw, and fence panels. Other helpful tools may include a power drill, string line, and safety gear.
Can I install a fence alone, or do I need help?
While it’s possible to install a fence alone, having at least one helper can make the process easier, especially for lifting heavy panels and ensuring the posts are level.
Are there any common mistakes to avoid during fence installation?
Common mistakes include improper spacing of posts, forgetting to check local regulations, underestimating material needs, and neglecting to account for uneven terrain.


