Learn how to install a chain link fence with our step-by-step guide, covering tools, preparation, post setup, fabric attachment, and maintenance tips.Installing a chain link fence can be a rewarding DIY project that enhances your property’s security and aesthetic appeal. Whether you want to keep pets safe, define property boundaries, or add a decorative touch to your yard, doing it yourself can save you money and provide a sense of accomplishment. In this blog post, we’ll guide you through the essential steps to successfully install a chain link fence on your own. From gathering the necessary tools to preparing your area for installation, setting the fence posts, attaching the chain link fabric, and finishing touches, we’ll cover everything you need to know. With a little patience and some handy tips, you’ll have your fence up in no time, ready to withstand the test of weather and time. Let’s dive in!
Gathering the Necessary Tools
Before embarking on your project of installing a chain link fence, it’s essential to gather all the necessary tools. Having the right tools will streamline the process and ensure you can work efficiently.
- Tape Measure – For accurately measuring the length of the area where the fence will be installed.
- Post Hole Digger – To create holes for the fence posts.
- Level – To make sure the posts are aligned properly and the fence is straight.
- Fence Tension Wire – Necessary for securing the fabric to the posts.
- Chain Link Fabric – The main component of the fence, which comes in various heights and gauges.
- Wire Cutters – For cutting the tension wire and other fencing materials.
- Installer’s Tool – Specifically designed for attaching the chain link fabric to the frame.
- Safety Gear – Including gloves and goggles to protect yourself while working.
Having these tools on hand will not only make the installation smoother but also help prevent any delays. Additionally, it’s a good idea to review the manufacturer’s instructions for any specific tools that may be required for the chain link system you choose.
Before you start, double-check that all your tools are in good working condition. If you’re missing any items, it’s best to purchase or borrow them ahead of time.
Preparing the Area for Installation
Before diving into the actual installation of your chain link fence, it’s crucial to prepare the area properly. This step ensures a smooth and efficient installation process. Start by clearing the area where the fence will be installed. Remove any debris, rocks, or vegetation that might obstruct your work. A clean site makes it easier to set the fence posts and secure the chain link fabric.
Next, you’ll want to mark the fence line. Use stakes and string to outline where the fence will go. This will give you a clear visual reference as you work. Make sure to measure carefully; a well-marked line will save you time and hassle later. It’s recommended to double-check your measurements to ensure that the fence will be straight and in the right position.
Additionally, you should check for any local regulations or HOA guidelines regarding fence installation. Some areas may have restrictions on height, material, or even placement that you’ll need to adhere to. You may also want to talk to your neighbors about your plans to keep them informed and potentially avoid any disputes later on.
Setting the Fence Posts in Place
After you’ve gathered all the necessary tools and prepared the area for installation, the next crucial step is setting the fence posts in place. Proper installation of the posts ensures that your chain link fence will be stable and durable for years to come. Here’s a step-by-step guide to help you through this essential process.
1. Mark the Post Locations: Use stakes and string to mark where each post will go. This step is vital for ensuring that your fence will be straight. Measure the distance between posts to keep the spacing consistent—typically, this is between 5 to 10 feet apart.
2. Digging Holes: Now it’s time to dig. Each hole should be about one-third the height of the post and a minimum of 6 inches in diameter. A post hole digger is typically the tool of choice for this task. Make sure that the holes are deep enough to anchor the posts securely and prevent tipping.
3. Placing the Posts: Carefully set a fence post into the hole, ensuring it is plumb (vertically straight). Use a level to check this; you may want to have a partner hold the post steady while you work. Fill the hole with gravel or concrete for added stability. If using concrete, ensure to follow the drying times indicated by the manufacturer.
4. Setting the Posts: For optimal support, let the posts set for at least 24 hours before proceeding with the installation of the chain link fabric. This waiting time allows the concrete to cure properly and helps maintain the integrity of your fence line.
By following these steps, you are now prepared to set the fence posts effectively, which is crucial for the overall success of your chain link fence installation.
Attaching the Chain Link Fabric
Once you have securely set the fence posts in place, the next step in installing a chain link fence is attaching the chain link fabric. This process will involve several crucial steps to ensure that the fabric is installed correctly and will provide the durability and security needed.
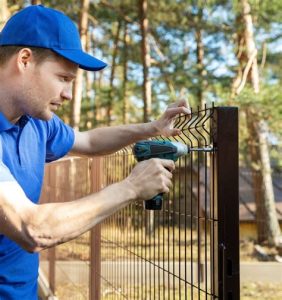
First, lay out the chain link fabric along the fence line to determine the amount needed. Start at one end of the fence, using the tension bar to anchor the fabric to the terminal post. Insert the tension bar into the chain link fabric, making sure it is aligned straight. It is essential to ensure that the fabric is taut but not overly stretched, as this can cause damage over time.
Next, use tie wires or clips to secure the fabric to the posts. Typically, you will want to attach the fabric at every third hole on the chain link for adequate support. Once you have completed the first side, repeat this process on the opposite end. Remember to check for levelness and adjust as necessary to ensure a uniform look. Finally, trim any excess fabric and install the top rail if required.
Finishing Touches and Maintenance
Once you have installed your chain link fence, the finishing touches and maintenance are essential steps to ensure longevity and functionality. Start by inspecting the entire fence for any gaps or loose fittings that might require adjustments. This will help in achieving a secure and aesthetic finish.
Next, you can enhance the look of your chain link fence by adding edge treatments. Consider using shrubs, climbing plants, or decorative rocks along the base. This not only improves the fence’s appearance but also helps integrate it into your landscape.
Lastly, regular maintenance is key to keeping your fence in top shape. Inspect for any rust or damage every few months. If you spot any issues, treat them immediately to prevent larger problems in the future. Remember, the life of your chain link fence can significantly increase with just a bit of regular care!
Frequently Asked Questions
What materials do I need to install a chain link fence?
You will need chain link fabric, fence posts, top rails, tension bands, tension wire, and concrete for setting the posts.
How deep should I dig the post holes for the fence?
Each post hole should be at least one-third the height of the post deep, typically 2 to 3 feet for standard fence heights.
Is it necessary to use concrete for setting the posts?
Using concrete is recommended as it provides stability and helps to secure the posts against wind and ground movement.
How do I determine the layout of my fence?
Measure the area where you want to install the fence, using stakes and string to outline the perimeter and mark where each post will go.
What tools do I need for installing a chain link fence?
You will need a post hole digger, a level, a measuring tape, wire cutters, a hammer, and a concrete mixer if you are mixing your own cement.
How do I attach the chain link fabric to the fence posts?
Use tension bands and ties to attach the chain link fabric to the posts; make sure to pull the fabric taut to avoid sagging.
What should I do if the ground is uneven where I want to install the fence?
You may need to adjust the height of the posts accordingly or consider using a sloped top rail to accommodate the uneven ground.
