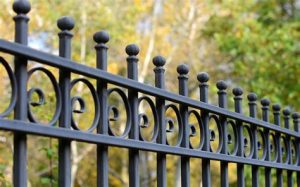
Discover essential steps for fence installation, from assessing the landscape to assembling panels, ensuring a durable and attractive outcome for your property.Installing a rod iron fence on uneven ground can be a daunting task, but with the right approach and tools, it’s entirely achievable. Fences not only enhance the aesthetic appeal of your property but also provide security and privacy. However, when faced with a landscape that isn’t perfectly level, proper planning becomes essential. In this blog post, we’ll guide you through the essential steps needed to successfully install a rod iron fence, regardless of the challenges posed by uneven terrain. From assessing your landscape and choosing the right materials to prepping the ground and assembling the fence panels, we’ll cover everything you need to know to ensure a sturdy and visually pleasing installation. Let’s dive in and transform that irregular landscape into an elegantly fenced area!
Assessing the Landscape
When it comes to installing a rod iron fence on uneven ground, the first crucial step is assessing the landscape. Understanding the unique characteristics of your property will not only help you plan appropriately but also save you time and resources.
Begin by observing the terrain. Look for slopes, dips, and other variations in elevation that could affect your fence’s installation. It’s essential to take notes on the overall layout, as this will guide your decisions later on. You can also utilize tools like a level or a transit to measure the slope of the ground accurately.
Once you’ve mapped out the key features of your landscape, create a sketch or a diagram to visualize the area where you intend to install the fence. This visual aid can help identify potential challenges, such as trees, bushes, or existing structures that may interfere with your fence line.
Choosing the Right Materials
When considering how to install a rod iron fence on uneven ground, the choice of materials is crucial for both durability and aesthetic appeal. Selecting the right materials contributes not only to the stability of the fence but also to its ability to withstand the elements.
- High-quality iron for the posts and panels
- Concrete mix for securing the posts
- Protective paint or coating to prevent rust
- Gravel or a similar material for drainage
It is advisable to choose galvanized steel for the fence panels as it offers enhanced resistance to corrosion. For uneven terrain, flexibility in design and material would allow for proper adjustments, ensuring your fence is both secure and visually appealing.
Prepping the Ground
Preparing the ground is a critical step when installing a rod iron fence, especially on uneven terrain. Proper groundwork ensures stability and accessibility for the fence.
- Clear the Area: Start by removing any vegetation, rocks, or debris within the intended fence line. This will provide a clean slate for your installation.
- Measure the Perimeter: Use a measuring tape to define the boundaries of your fence. Mark the corners with stakes or flags, ensuring that the measurements correspond to the desired layout.
- Level the Ground: Evaluate the topography of the land. For slopes or irregularities, you may need to bring in additional soil or remove excess dirt. Use a shovel, rake, and level to help create an even surface.
- Compact the Soil: If you are adding soil, compact it well to minimize settling. This can be done using a hand tamper or a plate compactor for larger areas.
Once the ground is prepatted, you will notice a marked difference in how the fence is installed and how stable it will be over time. A carefully prepared foundation will not only enhance the aesthetics of your rod iron fence but will also increase its longevity.
Don’t underestimate the importance of this preparatory work. Skipping these steps can lead to uneven posts, gaps in the fence, and even potential damage during high winds or storms. Ensure you take the time necessary for this crucial phase of the installation.
By investing effort into prepping the ground, you set the stage for a successful rod iron fence installation that will stand the test of time.
Installing the Posts
When it comes to installing a rod iron fence on uneven ground, installing the posts correctly is crucial to ensuring the durability and stability of your fence.
- Mark Your Locations: Start by marking the locations where you will install the posts. Use string lines and stakes to ensure that everything is aligned according to your desired fence layout.
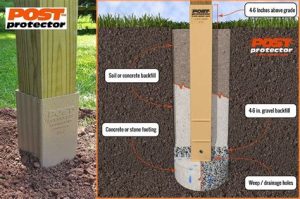
- Dig the Post Holes: Dig holes for your posts. The depth of each hole should be about one-third the height of the post above ground. Remember that on uneven ground, you might need to vary the depth to achieve a consistent fence height.
- Level the Posts: Once you’ve placed the posts in their respective holes, use a level to ensure they are straight. This is especially important on uneven ground where gravity can cause tilt. Adjust the holes as necessary until the posts are perfectly vertical.
For added stability, consider using concrete to secure your posts. Pour the concrete mix into the holes around the posts and allow it to set according to the package instructions. This method will provide a solid foundation, especially on uneven terrain.
Once the concrete is set, it’s important to backfill the holes with soil or gravel. This will help support the posts and prevent shifts caused by water runoff or soil expansion.
Before moving on to the next step of assembling the fence panels, conduct a final check of the post heights and alignments. This will save you time and effort later on in the installation process.
Assembling the Fence Panels
Once you have successfully installed the posts for your rod iron fence, the next significant step is assembling the fence panels. This stage is crucial as it directly influences both the aesthetic appearance and the structural integrity of your fence.
- Fence panels
- Bolts and nuts
- Brace brackets
- Tools such as a wrench, screwdriver, and level
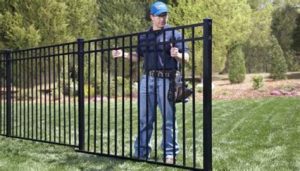
Once everything is in place, elevate the first panel and attach it to the previously installed posts using the brace brackets. Make sure to use a level to confirm that the panel is straight and adjust if necessary. Secure the panel in position by tightening the bolts and nuts, ensuring a snug fit. Repeat this process for the remaining panels, paying special attention to maintain a consistent height and alignment to achieve a polished look.
Finally, once all the panels are assembled, take a step back and inspect the overall structure of your newly installed rod iron fence. Ensure that each panel is securely fastened and that transitions between panels are smooth. This attention to detail will help you enjoy the aesthetic benefits that come with a well-constructed fence.
Frequently Asked Questions
What materials are needed to install a rod iron fence on uneven ground?
You will need rod iron panels, concrete, post anchors, gravel, a level, a measuring tape, a saw, and potentially additional tools like a auger for post holes.
How do I prepare the ground before installing the fence?
Begin by clearing the area of debris and vegetation, then assess the level of the ground. You may need to use a shovel or other tools to level out particularly uneven spots.
Can I install a rod iron fence directly onto the ground?
It’s not advisable to install a rod iron fence directly onto uneven ground. Posts should ideally be anchored in concrete to provide stability and support.
What is the best way to determine the height of the fence posts?
The height of the posts can be determined based on the desired height of the fence panels. Measure from the highest point of the ground to where you want the top of the fence to be, and consider adding a few inches for the concrete base.
How do I ensure the fence is level when installing on uneven ground?
Use a level tool while setting the posts. Adjust each post height as necessary based on the surrounding terrain to keep the top of the fence panels even.
What should I do if there are large rocks or roots in the way?
If you encounter large rocks or roots while digging, you may need to remove them manually or adjust your fence layout. In some cases, it might be necessary to use a jackhammer or saw to clear these obstacles.
How can I maintain my rod iron fence once installed?
Regular maintenance includes checking for rust or paint damage, cleaning the fence with a gentle detergent, and repainting sections as needed for protection against the elements.
